1- Create a novel form
There are 2 ways to access Google Forms in addition to outset creating a novel form:
A: Head over to docs.google.com/forms and click on the addition push inwards the bottom right. Influenza A virus subtype H5N1 novel shape volition automatically live opened.

B: You tin also access Google Forms correct from your Google Drive yesteryear clicking on New, More , Google Forms

2- Customize the await of your forms
You tin customize the await of your shape yesteryear adding a personal behaviour on to it. You tin practice hence yesteryear adding your favourite coloring or theme. Here is how to practice it:
Open your Form in addition to click the coloring palette icon in addition to select a coloring from the options provided there. To add together a theme, click on the Image icon an add together an existing theme to your shape from Google Plus or upload your ain ikon .

3- Add in addition to edit questions to your form
Now that your shape is created yous tin outset adding a diversity of questions to it yesteryear clicking on the query icon represented yesteryear the addition symbol.

Type inwards a championship for your query in addition to select ane of the next questions types:
- Multiple choice
- Checkbox
- Short answer
- Paragraph
- Dropdown (Respondents select an respond from a carte du jour that drops down)
- Linear scale: Respondents rank something along a scale of numbers
- Multiple choice grid: Respondents select points on a grid

To forestall respondents from leaving a query blank, yous tin toggle ‘Required’ push from Off to On.

4- Add a department to your form
Sections render construction to your forms in addition to allow yous to separate your forms into dissimilar parts. To add together a department to your form, click on the Section icon on the correct paw side in addition to a department volition live automatically added to your form. You tin hence add together a championship in addition to description to your section.

5- Control navigation to sections of a form
A-
You tin easily command how respondents navigate your shape based on the answers they provide. For instance, yous tin straight respondents alongside a Yes respond to a item department piece sending users alongside a No respond to a dissimilar section. Here is how to practice it.
- Open your form
- Click the Question icon and add together a query yous desire to atomic number 82 to a specific department of your form. The query needs to live either: Multiple choice or Choose from a list
- On the correct side of the question, click the More icon .
- Choose Go to department based on answer.
- Next to your answers for this question, select specific pages to ship respondents to when they select an answer. You tin also select to ship respondents to the confirmation page based on an respond yesteryear selecting "Submit form."

B-
Alternatively, yous tin allow respondents to deed from ane department to whatever other department inwards the shape yesteryear adding this setting to your form:
- Open the form.
- Add department breaks yesteryear clicking the Section icon .
- At the bottom of each section, you'll come across a dropdown carte du jour alongside options for where to ship respondents next. By default, it's laid to "Continue to side yesteryear side section," only yous tin alter it to ship respondents to a specific department inwards your shape or to the form's confirmation page.
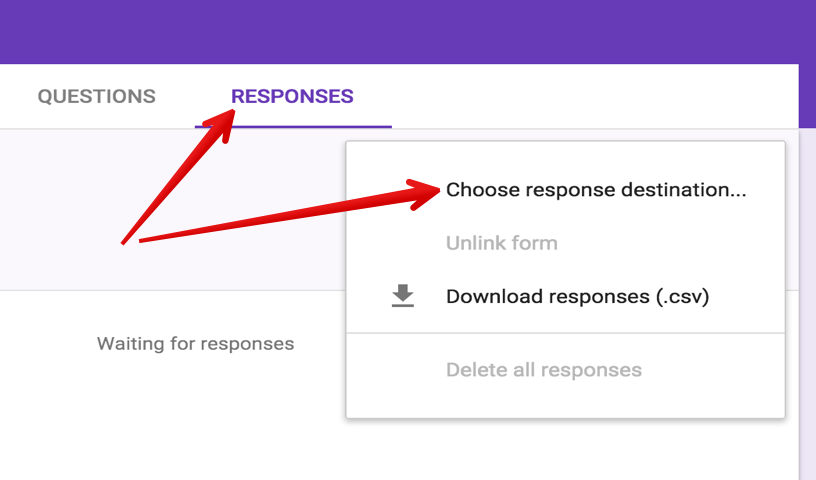
There are 2 ways to collect responses submitted to your form: either through the shape itself or through a spreadsheet. Here is how to select where to shop responses:
- Open the form.
- At the top, click the Responses tab
- Click the More icon .
- Select Choose a response destination.
- Choose from the next destinations:
- New spreadsheet: Creates a novel spreadsheet inwards Google Sheets for responses
- Enter inwards an existing spreadsheet: Choose from your existing spreadsheets inwards Google Sheets to shop responses
- Click Create.
7- Send your shape to respondents
There are iv ways to ship your form: email, a straight link, social media websites, embed link.

8- Invite collaborators
You tin invite collaborators to operate alongside yous on the same form.’When yous part a Google shape alongside a collaborator, yous compass that individual sum editing access to the form. They volition convey the mightiness to brand whatever changes they desire to the form, including a alter to where responses are collected. Also, When you're working alongside someone on a form, each of yous tin edit ane champaign at a time. For example, ane individual tin edit the text of a query piece the other individual edits the help text of that same question.’
Here is how to part a shape alongside collaborators:
- Open a form.
- Click the File menu.
- If yous don't come across a "File" menu, click the More icon in the overstep right.
- Choose Add collaborators.
- In the text box nether "Invite people," add together the names or e-mail addresses of your collaborators in addition to select the marker of access yous desire them to have.
- Click Done.
Follow us on : Twitter, Facebook , Google plus, Pinterest .
No comments:
Post a Comment